The reason I like Hugo so much is partly because of its great documentation. Yet I do believe that Hosting on GitHub tutorial can be improved a little. It contains some redundant information on how to create a blog with Hugo and focuses on GitHub Project Pages for the most part. It does provide you with steps on how to host a personal blog on GitHub User Pages, but this solution requires separate repositories for your blog’s source and generated static result. And with git subtree you can do it in one GitHub repo. It took me some time to configure everything especially that I knew little about git subtree. So I’ve decided to write my own article on GitHub publishing.
Prerequisites
I assume that you are familiar with Git and have already generated a Hugo website. You are going to have something like this in your website’s directory:
archetypes
content
data
layouts
public
static
themes
config.toml
README.md
public folder contains your generated static website. I’ve also added README.md.
Goal
So you want to host your Hugo generated website on GitHub Pages. It’s natural to put your site’s sources in a GitHub repo too.
With Jekyll you can just put everything in your master branch and GitHub would handle everything else for you.
In the case of Hugo we need to do some additional work as GitHub requires your static website to be in the root of the master branch.
The idea is to have the contents of public folder on your master branch, whereas other source files on some other orphan branch (e.g. source). The public folder on your source branch is going to mirror the master branch. This can be achieved with git subtree. I encourage you to read more about git subtree, however if you don’t feel like reading much today or just want to get results faster, here’s a tutorial for you.
Solution
I usually use SourceTree for most of my Git related work. Unfortunately SourceTree doesn’t work very well with Git subtrees. Don’t worry anyway. There are just a few commands you need to type in your terminal.
Initialize the master branch:
# Unstage all files
git rm -rf --cached .

git add README.md

git commit -m "Initial commit on master"
Commit everything to an orphan source branch:
git checkout --orphan source

# Remove the public folder to make room for the master branch subtree
rm -rf public

git add .

git commit -m "Initial commit on source branch"
Push everything to GitHub:
git remote add origin https://github.com/tolikcode/tolikcode.github.io.

git push origin master

git push origin source
This is the most crucial command in this article. Add the master branch as a public folder:
git subtree add --prefix=public https://github.com/tolikcode/tolikcode.github.io.git master --squash
Workflow
That’s it! Your website is hosted on GitHub. Now your blogging workflow should be fairly simple. You just add new blogposts, edit templates, themes etc. Then you regenerate your website and commit everything to the source branch:
hugo -t ThemeName
git add -A
git commit -m "Updating site" && git push origin source
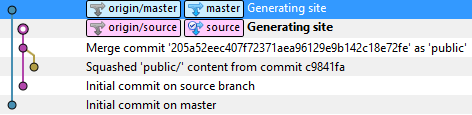
If you have done everything correctly your Git commit history should look something like this:
When your changes are ready to see the world just publish them with subtree push command to the master.
git subtree push --prefix=public https://github.com/tolikcode/tolikcode.github.io.git master
Now you can find your shiny new website at http://yourusername.github.io/.